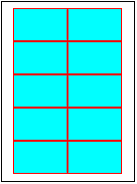
The layout screen allows you to enter the properties for a new layout or edit the properties of an existing layout. The layout defines how teh elements (cards or labels) are arrangedon the page. For example, the standard business card layout is defined as follows:
|
Width
|
3.5
|
|
Height
|
2.0
|
|
Rows
|
5
|
|
Columns
|
2
|
|
Space between rows
|
0
|
|
Space between columns
|
0
|
|
Side margin
|
0.75
|
|
Top margin
|
0.50
|
This would produce a page arranged like this:

When you create a new file based on this layout you will be given a 3.5 x 2.0 inch area to design. When you print a full page, ten cards will be printed on the page, arranged as shown above.
To enter the properties for a layout perform the following steps:
1. Enter the name of the layout.
2. Select the paper type.
3. Enter the width and height of a single element (this is the size of a single element on the page).
4. Enter the number of rows and columns on a page.
5. Enter the top margin.
6. Enter the side margin.
7. Enter the spacing between each column.
8. Enter the spacing between each row.
9. Click OK.
Notes:
The Region Type area is provided for informational purposes only. Region information cannot (and need not) be changed.
The layout should be entered in a portrait orientation. That is, as if you are looking at the paper with the long side up and down.
The sum of the widths, margins and spacing between columns should equal the width of the paper.
The sum of the heights, margins and spacing between rows should equal the height of the paper.


